

Tutorial: writing Framework using improved framework target
16 Jan 2018 | target-framework tutorialThere was a framework target in MobiVM/RoboVM for a while. But there was no any integration with Idea IDE and there was no template project available till PR253. Also this PR introduces framework support library binary that simplifies Framework development as all native code that is required to initialize VM is embedded into this library.
This Tutorial will explain what can be done with Framework target:
- Java functionality that can be wrapped into framework without writing any native support code;
- Comfortable API for Framework users – no need to use JNI/any other workarounds to use it;
What can’t be done:
- no bitcode support. To use such kind of framework App has to disable bitcode;
- debugging in xcode is not possible as any NPE in java code will cause EXC_BAD_ACCESS, this can’t be disable in xcode lldb with
process. check this post or details. This issue can be solved by introducing thread-level mach exception handler; - there is no way to directly debug framework in Idea, will be added later;
- it is still not possible to use ObjC representation of java classes directly, as RoboVM doesn’t create these compilation time (can be added later);
- it is not possible to create instance of ObjC classes that are exposed in framework (due reason above), so factory pattern has to be used;
(skip long read and start creating framework)
Before starting writing the code lets overview existing examples of frameworks with RoboVM:
There in general two of them:
First one demonstrate how to get some “hello world” by manipulating Java VM native interface. It is bunch of code normal user of third party framework usually prefer not to know: Each single java api call has to be wrapped into a dozen lines of code.
Second approach tries to play gently for Framework customer but inside it full of workarounds for developer. Here are few moments from simplified MobiVM AnswerMe SDK Sample
It provides framework header and defines AMCounter and AMAnswerMeSDK objc classes.
If class is defined and referenced in ObjC code there SHALL be implementation of this class during link phase. Issue here is that RoboVM doesn’t generate ObjC classes for CustomClass object during compilation. Instead it registers them once running using Objective-C Runtime. So any try to use them will lead to error during linking phase:
Undefined symbols for architecture x86_64:
  "_OBJC_CLASS_$_RoboVmSdk", referenced from:
      objc-class-ref in ViewController.o
But it that samples there is native sublayer with these classes defined. Kind of:
/*
 * Empty definitions and implementations of AMTopic and AMIcon. The real
 * implementations are in the AMTopicImpl and AMIconImpl classes in Java.
 * Think of the classes here as abstract base class even though Objective-C
 * doesn't have proper abstract classes.
 */
@interface AMCounter : NSObject @end
@implementation AMCounter @end
Comments say to think about these classes as abstract but real purpose of these classes is just to satisfy link phase.
These classes are never used as it is, instead completely different class instances are created, for example AMAnswerMeSDKImpl is created and then ‘casted’ to AMAnswerMeSDK.
/*
 * AMAnswerMeSDKImpl.initialize() has now introduced the impl classes in the
 * Objective-C runtime.
 */
Class answerMeSDKClass = NSClassFromString(@"AMAnswerMeSDKImpl");
There is no casting as these don’t share same ancestor. It works just because obj-c allows to send send selector to what ever object, the only this selector has to be present in target object. But this approach is not so good for Swift
end of long read
Simple approach that allows quick writing of Framework
For beginning it is good idea to remove ugly parts:
initialization of VM and framework was moved to framework support library as part of PR253. No need anymore to bother with xcode and pack both native and java code into framework target. Just create framework project from template and write java code. Support library adds following function:
NSObject* rvmInstantiateFramework(const char * className)
it takes an argument className, it is a java class name of Framework entry class, e.g. facade class that will open access to Framework API. This function is invoked once and saves pointer. Further calls to it will just return saved pointer. Sample usage:
//
// static function that returns instance of Framework's main class. On first access it also instantiate RoboVM
//
static SampleSDK* SampleSDKInstance() {
    extern SampleSDK* rvmInstantiateFramework(const char *className);
    return rvmInstantiateFramework("org.robovm.samples.framework.SampleSDKImpl");
}
Framework facade class SHALL implement public static NSObject instantiate() method. Function rvmInstantiateFramework will call this method to obtain facade singleton object. For example:
public class SampleFrameworkImpl extends NSObject implements Api.SampleFramework {
    private static SampleFrameworkImpl frameworkInstance = new SampleFrameworkImpl();
    /**
     * IMPORTANT: this method is being called after VM is initialized to obtain SDK root object
     * do not remove it
     */
    public static NSObject instantiate() {
        return frameworkInstance;
    }
    ...
}
ObjC classes in Framework api make pain as described above the solution is not to expose API as ObjectiveC object but instead use protocols to define API. Example:
public final class Api {
    interface Calculator extends ObjCProtocol {
        @Method int reset();
        @Method int add(int i);
        @Method int sub(int i);
        @Method int result();
    }
}

// re-formatted to keep sample compact
public class CalculatorImpl extends NSObject implements Api.Calculator {
    private int register;
    @Override public int reset() {return register = 0;}
    @Override public int add(int i) {return register += i;}
    @Override public int sub(int i) {return register -= i;}
    @Override public int result() {return register;}
}
And Calculator class is exposed in facade class as bellow:
public final class Api {
    // this protocol is main class protocol that root entry point to SDK
    interface SampleFramework extends ObjCProtocol {
        ...
        @Method Calculator createCalculator();
    }
}

public class SampleFrameworkImpl extends NSObject implements Api.SampleFramework {
    ...
    @Override
    public Api.Calculator createCalculator() {
        return new CalculatorImpl();
    }
}
IMPORTANT: do not name methods that create Java object with name that begins with “alloc”, “new”, “copy”, or “mutableCopy” otherwise you end up with EXC_BAD_ACCESS. Name newCalculator really bad. Read this post for reasons and possible workaround to if name has to start with new.
Declaration of these API in framework ObjectiveC header will looks as bellow:
// Calculator API -- everything is exposed as protocols
@protocol Calculator
-(int)reset;
-(int)add:(int) i;
-(int)sub:(int) i;
-(int)result;
@end

// MyFramework of framework. it is entry point to framework.
@protocol MyFramework
-(NSObject<MyFramework> * ) createCalculator;
@end
It is not comfortable to use NSObject<MyFramework> * around in ObjectiveC code, the good idea is typedef it and give it a nice name. Also set nice naming for Swift by attaching NS_SWIFT_NAME:
// Calculator API -- everything is exposed as protocols
NS_SWIFT_NAME(Calculator)
@protocol Calculator
-(int)reset;
-(int)add:(int) i;
-(int)sub:(int) i;
-(int)result;
@end
// and typedef NSObject<Calculator> to Calculator which makes to make code better readable
typedef NSObject<Calculator> Calculator;

// MyFramework of framework. it is entry point to framework.
NS_SWIFT_NAME(MyFramework)
@protocol MyFramework
-(Calculator *) createCalculator;
-(void) sayHello;
-(NSString*) roboVmVersion;
@end
typedef NSObject<MyFramework> MyFramework;
These small changes make usage of SDK API in ObjectiveC/Swift comfortable:
MyFramework* sdk = MyFrameworkInstance();
Calculator* calc = [sdk createCalculator];
[calc add:123];
[calc sub:23];
NSLog(@"%d", [calc result]);
and in Swift
var sdk:MyFramework!;
sdk = MyFrameworkInstance();
var calc:Calculator;
calc = sdk.createCalculator();
calc.add(123);
calc.sub(23);
NSLog("%d",calc.result()
Creating framework step-by-step
Source code is available at my robo-samples github repository.
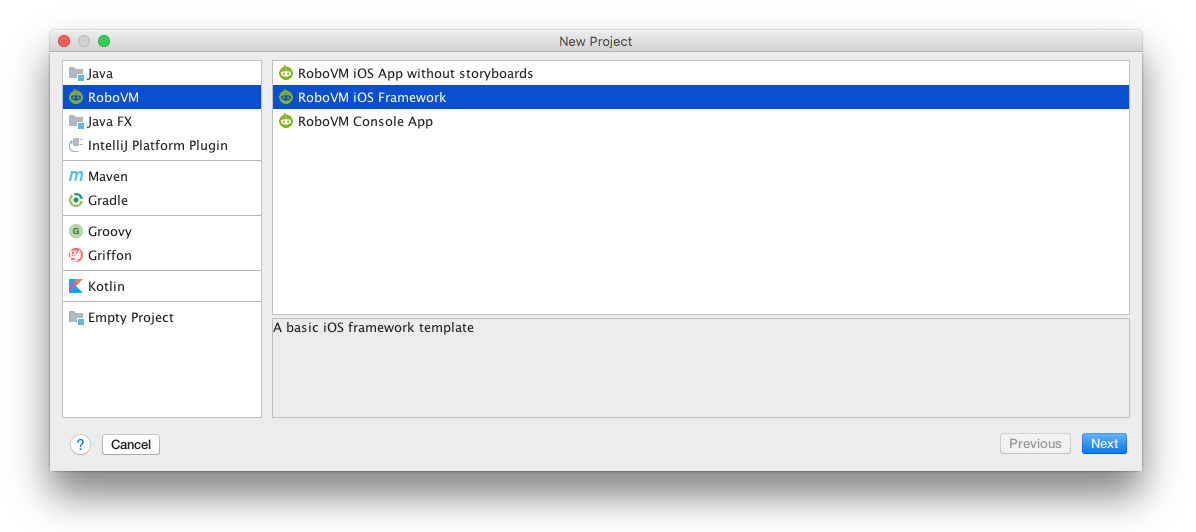
Start with Framework RoboVM project:
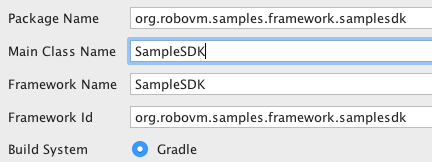
When configuring project fill down values as specified bellow:
Continue with gradle configuration step and once finished project will be opened in Idea. Project tree will look as bellow:
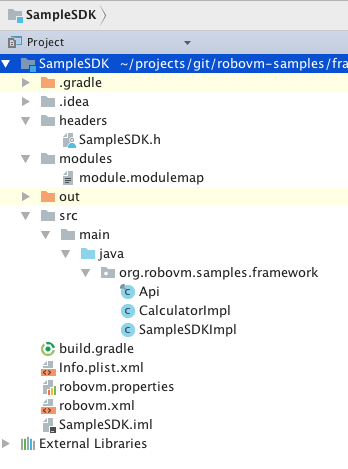
Following files were generated:
- src/main/java/ - folder contains source code for Framework
- Api.java - specified API of framework, the protocols that will be exposed;
- SampleSDKImpl - facade implementation with basic Api implemented;
- CalculatorImpl - implementation of Calculator API
- headers/SampleSDK.h - header file that will be copied to Headers folder of framework. It is already filled with ObjectiveC symbols that correspond to API defined. Once there is any change to API happens this header shall be updated to allow ObjectiveC/Swift applications to see it. This file is being copied through Resource rule in robovm.xml.
- modules/module.modulemap - contains module definition of framework to allow it to be used with Swift. In general there is nothing to change in this file. This file is being copied through Resource rule in robovm.xml.
At this point Framework project from template already contains basic code that allow to start using it.
Create XCode demo project
(Project has to be created before the Framework as it will be used as Destination directory during framework build)
- Create new iOS
Single View Appproject. Give itSampleSDKDemoObjectiveCname (orSampleSDKDemoSwiftin case of swift);
Building framework
- Back to idea, navigate to RoboVM menu and select
Create Framework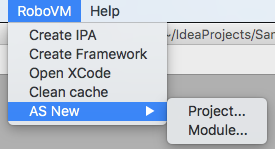
- In the dialog specify
Destination Dirto point toSampleSDKDemoObjectiveCwhere sample project is located;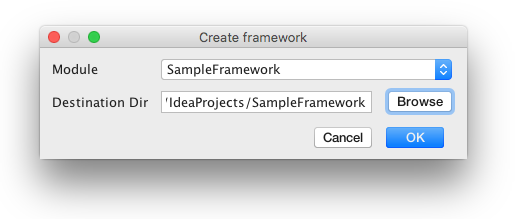
- build and check RoboVM log window for details
Configuring XCode to use framework
- back to XCode, open Finder and drag-and-drop
SampleSDK.frameworkto XCode project tree, selectCopy items if neededandCreate folder references; - in project setting disable bitcode;
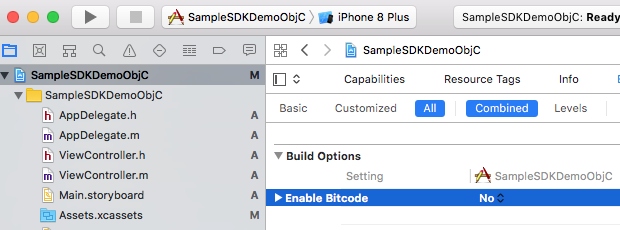
- open Project setting
Build Phasesscreen and check if framework is present in ‘Link Binary With Libraries’ list; - hit + and add
New Copy Files Phase:- rename it to
Copy Frameworks - Change
DestinationtoFrameworks - hit local + and select
SampleSDK.framework
- rename it to
- Final
Build Phasesshould look similar to this screen: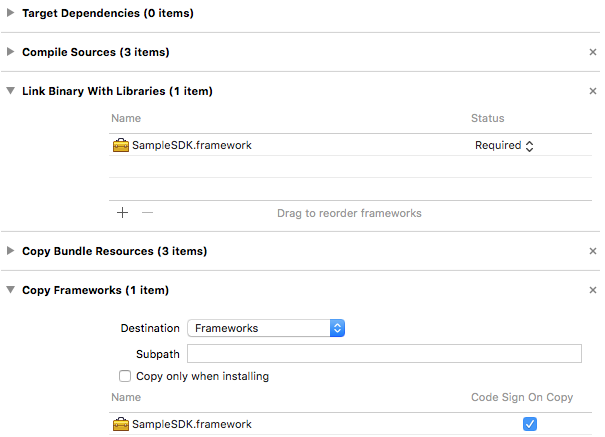
Try building and running Demo project. If it deploys to Device/Simulator – it is configured properly
Using framework in XCode project – ObjectiveC
Modify ViewController.m by adding imports of Framework and test code in viewDidLoad:
#import <SampleSDK/SampleSDK.h>
@implementation ViewController

- (void)viewDidLoad {
    [super viewDidLoad];
    // testing RoboVM framework
    SampleSDK* sdk = SampleSDKInstance();
    NSLog(@"RoboVM version %@", [sdk roboVmVersion]);

    Calculator * calc = [sdk createCalculator];
    [calc add:123];
    [calc sub:23];
    NSLog(@"%d", [calc result]);
}
@end
Run it an there shall be output to console:
SampleSDKDemoObjC[33475:3747683] RoboVM version 2.3.4-SNAPSHOT
SampleSDKDemoObjC[33475:3747683] 100
Using framework in XCode project – Swift
Modify ViewController.swift by adding imports of Framework and test code in viewDidLoad:
import UIKit
import SampleSDK

class ViewController: UIViewController {

    override func viewDidLoad() {
        super.viewDidLoad()

        // testing RoboVM framework
        var sdk:SampleSDK!;
        sdk = SampleSDKInstance();
        NSLog("RoboVM version %@", sdk.roboVmVersion());

        var calc:Calculator;
        calc = sdk.createCalculator();
        calc.add(123);
        calc.sub(23);
        NSLog("%d",calc.result());
    }
Bonus track: adding new API to Framework
Lets build a simple web server using power of maven repos. Back to Idea and SampleSDK project;
- add
nanohttpd-webserverto gradle dependencies;// build.gradle dependencies { ... // https://mvnrepository.com/artifact/org.nanohttpd/nanohttpd-webserver compile group: 'org.nanohttpd', name: 'nanohttpd-webserver', version: '2.3.1' } - add new interface
WebServerto Api.java and modifySampleSDKinterface SampleSDK extends ObjCProtocol { ... @Method WebServer webServer(); } /** this protocol defines api for internal web-server */ interface WebServer extends ObjCProtocol { @Method void start(); } - add
WebServerImpl.javaimplementation/* simple webserver api implementation */ public class WebServerImpl extends NSObject implements Api.WebServer { private SimpleWebServer server; @Override public void start() { if (server != null) { System.out.println("WebServer already started "); return; } server = new SimpleWebServer(null, 8081, new File("/"), false); try { server.start(); } catch (IOException e) { e.printStackTrace(); } } } - modify facade
SampleSDKImplto implement web server getterpublic class SampleSDKImpl extends NSObject implements Api.SampleSDK { private static Api.WebServer webServerInstance = new WebServerImpl(); ... @Override public Api.WebServer webServer() { return webServerInstance; } } - modify SampleSDK to reflect API changes
NS_SWIFT_NAME(WebServer)
@protocol WebServer
-(void)start;
@end
typedef NSObject<WebServer> WebServer;

NS_SWIFT_NAME(SampleSDK)
@protocol SampleSDK
-(Calculator * ) createCalculator;
-(void) sayHello;
-(NSString * ) roboVmVersion;
-(WebServer * ) webServer;
@end
- call api from demo project
override func viewDidLoad() { super.viewDidLoad() // testing RoboVM framework ... sdk.webServer().start(); } - access the page by address
http://127.0.0.1:8081(replace 127.0.0.1 with device IP if running on device)
IMPORTANT: using crash reporters in host application
Same as in RoboVM application reporters has to be initialized inside Signals.installSignals callback, check these posts for details:
- Tutorial: Crash Reporters and java exceptions
- Framework target: EXC_BAD_ACCESS on NPE in try-catch block
In two words it shall use installSignals api provided by RoboVM framework project template like this:
- (BOOL)application:(UIApplication * )application didFinishLaunchingWithOptions:(NSDictionary * )launchOptions {
    // Override point for customization after application launch.

    // testing RoboVM framework
    SampleSDK* sdk = SampleSDKInstance();
    [sdk installSignalHandlers:^{
        [[Fabric sharedSDK] setDebug:true];
        [[Crashlytics sharedInstance] setDebugMode:true];
        [Fabric with:@[[Crashlytics class]]];
    }];

    return YES;
}
Comments